I. Installation
To install for Flash 8:- Close Flash
- IMPORTANT: Remove any previous installation, of the current panel being installed, from the Macromedia Extension Manager before installing the new version. Your preferences will not be deleted.
- Install the desired panel mxp . Ensure that it is enabled for the correct version of Flash in the Extension Manager.
- Run Flash, and open the panel in Window > Other Panels > {Panel Name}. You may need to open/create a FLA document to do this.
Notes.
- gPanel Pack v1 requires Flash 8. It is recommended for use with the Professional version, but will still function in the Standard version, although it might be missing key features.
- When binding keyboard shortcuts to a panel, Flash can sometimes confuse which panel to open. If this happens, disable/enable all custom panels in the Extension Manager.
- If running multiple versions of Flash, multiple versions of the Panels will exist, with a seperate saved preferences for each Panel.
- Occasionally, Flash opens the wrong custom panel. If you experience this problem, follow the instructions at OddHammer.com
II. Using gSearch

Library Search (view)
- Search for a string in library symbols. Toggle searching of Library name, linkage name, class name, and folder name.
- Double-click to quickly select instances in the library
- Double-click again to quickly edit the symbol
Timeline Search (view)
- Innovative timeline search to find instances with matching instance names, library names, linkage IDs and classNames. The timeline search scans all symbols' timelines for matching results.
- Also search for matching frame labels, sound names and linkages, and text instance names
- Timeline searches are chunked to support FLAs with large timelines without script timeouts
- Double-click results to quickly navigate to the layer and frame. Instances are selected.
File Search (view)
- Search a folder for files whose file contents contain a string. Supports regex
- Returns the file name, file type and number of matches per file
- Double-click to open the file
- Recent folder paths saved for later use
General
- Results are returned in an easily-sortable datagrid
- The panel maintains state between flash sessions, including the selected pane, and all radioButton states and search terms.
- Recent search terms are saved in a quick-access drop down menu
Working with gSearch :
- select a search type
- select a search option from the list
- click the "GO" button
III. Using gTextStyles

- Save a textfield's style into a quick-access list
- Apply a saved style to one or more text fields instantly
- Quickly choose which properties of the saved style to apply
- View style info, and preview styles inside the panel using user-configurable text.
- You must have at least one text field selected in order to use this gTextStyles
Adding a style:
Preview a style:
- select a text field on stage with the styles you would like to save
- click the "add" button
- give it a name and hit ok.
Removing a style:
- in the gTextStyles panel select the Preview tab.
- you can edit the text or click the links at the bottom to view different character sets.
Apply a style:
- removing a text style is the same process as gTodo. Simply open the combo box and click the x on the style you want to delete
This will apply the style with the selected properties in the prefs tab of the gTextStyles panel
- click on one or select multiple textfields on your stage and click the "apply" button
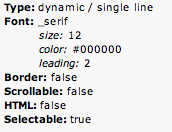
Info tab:Shows you things like text size, type of textfield,html, scrollable etc..
- gives you a look at all the properties of the textfield that you saved.
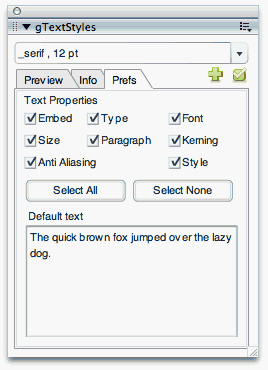
Properties to apply:Default text :
- go to the Prefs tab.
This tab contains a list of all the Text Properties you can apply using the gTextStyle Panel.
- anything that is checked will be applied when you click the "apply" button
- in the Prefs tab you can change the default text that shows up in the Preview tab.

IV. Using gTodo
About gTodo
The gTodo panel manages a list of "to-do" items in flash.
Features
- Simple, streamlined interface
- Manage multiple todo lists
- Single click item creation
- Drag-and Drop list of items (view)
- In-line editting (view)
- Color-coding for priority grouping (view)
- Context menus for enhanced interaction
- Complete/Incomplete status
- Auto-sorting of completed items
- Import and Export lists to share with other developers
Working with task lists
- click on the green "plus" symbol.

- enter in a task name and hit "".
- click on the beside the task name in the drop down box.

:
Importing a task list:Exporting a task list:
- click on the import button
- select the file you want to import and hit ok.
The exported file will be created at the selected location.
- select the you want to export
- click on the export button
- enter the desired name of the file that is to be exported and hit ok:
- browse to the folder you wish to save the file to and hit the ok button.
Adding a task item:
- type name into the text box and hit enter
You can also right click and select either Insert Above or Insert Below from the menu list. This will add a new Task Item Above or Below the item you right clicked on.
Edit a task item:Remove task item:
- double click on the task name or right click and select from the menu
Mark item as "Complete":
- right click on the item and select from the menu
The item will be moved to the bottom of the list and greyed out
- click on the check box of the completed item.
- You can use the highlights to organize your todo list in any fashion.
ex: make all red items urgent, all green items open items etc..
Assign a hightight to task:The task text color will change to the selected highlight.
- click on the black or colored box next to the task item and select desired color
Group by Highlight:This will group the task items together based on color
- right click on the blank white space of the todo panel and select group by highlight.
A slimmed down version of the gTodo panel is also available for free, but can only do simple list management.
V. Using gTweens

About the gTweens Panel
The gTweens Panel helps manage custom eases in timeline tweens.
- Create custom ease curves using the custom ease dialog, and then save them into the gTweens panel.
- Select a frame, multiple frames, or a block of frames in your timeline and apply a saved ease curve
- Export and import saved eases for sharing with other developers
- The panel is bundled with 9 pre-defined mathematically derived eases
Please note that this panel only stores and applies custom eases, it does not create them.
Using the gTweens Panel
Applying a Tween:You can also select multiple starting frames to apply the selected tween to.
- select the starting frame in the Flash timeline
- select a tween from the gTween list and click "apply"


